The owner of this guitar once borrowed mine and liked it so much I kept an eye out for one on his behalf. A little while ago I found this one and installed a bone nut and new wiring as well as a Seymour Duncan Jeff Beck in the bridge and a Seymour Duncan Jazz in the neck ~ perhaps the most popular aftermarket pickup combination which also happens to compliment this guitar incredibly well.
Here's a look at the wiring inside, taken when I wired this guitar together. I kept the original pots as they were perfectly functional and only mini pots like these can fit inside the f-hole! After wiring it together on a cardboard template, strings were fed through the holes on the soundboard and attached to their respective components then very gently pulled into place through the f-hole. A tedious process to say the least, but a fun project! Next one will be a lot easier...
Just over a week ago the owner approached me about installing a Bigsby on this beauty. After deciding on a model ~ B70 ~ I ordered one in and it arrived just on time for a very important show in a couple of days! Time to get to work...
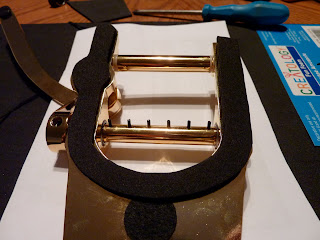
The local craft store has 12"x18" sheets of dense rubber foam, 1/8th" thick for under $2 a sheet! Same material that the preformed special designed Bigsby mounting adapters are made of. These also make great protective sheets for doing work on your instrument.
Problem solved ~ 100% positive contact under the entire stringed section. This material also acts as a bit of a lock-washer, in that it pushes back slightly against the mounting screws when compressed to form a more solid attachment. Tonally it will dampen vibration allowing it to be transferred through the bridge and soundboard instead of down the tailpiece.
Anchored by only the strap button, I strung a D and G string on the outside posts in the high & low E positions. This allowed more even and realistic tension when these were tuned to their proper notes, providing an accurate alignment with the bridge.
Something that isn't mentioned in the installation instructions ~ the strings must wrap around the anchor evenly and in-line with the ball end to ensure proper alignment. If it's off centre, it may pull the Bigsby slightly in either direction.
No power tools allowed! A hand drill provides much better control over the finished surface. Painter's tape was used to mark and drill the hole and was removed for this picture. A cordless drill would certainly do the trick, but there's too much of a risk of harming the finish. This is a good time to polish the area that will be covered by the Bigsby after it's installed!
Fully installed, the positive surface contact can be seen here. An added bonus is also that it prevents gig-gunk from collecting underneath!


