My other stuff...

Wednesday, September 29, 2010

1959 Valco National solid body


It's amazing what people have tucked away in their closets!  These guitars also carried the name Supro and Tosca with different configurations and colour schemes for each. Valco was a very popular manufacturer at the time, and this was their answer to the new solid body craze started by Fender and Gibson.  This one is in for a set-up and general cleaning to be put back in service again...


This nifty little short-scale guitar was made with quality components and it's unique characteristics make it a sought after model for slide players ~ just like the owner, who traded a record for this little gem many years ago!  It didn't play well at the time, so became a closet dust collector for future consideration...

To my surprise this is an unfixed bridge, with the tailpiece held on only by the strap pin, meaning string alignment, action and intonation adjustments will be a bit more challenging than usual.

Removal of the tailpiece revealed the grounding wire, which was also fastened down by the solid brass strap pin.

These models were available with one or two pickups, but all bodies were apparently routed for two.  An interesting top-mounted pickup with channels below to hide the wire under the pickguard. The neck joint is also rather unconventional, in that the neck profile carries through the entire length and the body mount was relief-cut to match the curve, then bolted on with two screws.

A vintage paper-in-oil .05uf capacitor is wired between the tone control and the sliding two-position switch, conceivably to cut some of the high end at will.  This component is long past it's expiry date and has little effect now, but will be left in at the owner's request to keep it all original.

Not a very tidy soldering job, but decent quality components that have stood the test of time.

This strange pickup looked even stranger when opened up!

Two coils mounted side-by-side.  This is relatively high output, measuring 9.2.  After this guitar was cleaned, polished and re-assembled with complete set-up, this pickup produced a surprisingly rich and balanced clean tone.

With it's short scale, this guitar looks more like a child's guitar.  It was tuned to open E then one full step up so the strings were (low-high) F, C, F, A, C, F to give a little more tension while also producing some inspiring tone!  Through a low-watt tube amp and a glass slide, this diminutive little National became quite a monster!


Monday, September 27, 2010

1961 Symphonic tube amp


What a great find!  A customer bought this the other day and dropped it off for some TLC.  It's a great example of one of the many amps that were made in Canada at the time, many of which are fantastic for recording and practicing.

This particular model has a very subtle and sweet sounding tremolo, as well as clean and dirty channels plus a quieter channel.  As expected, it has a two-prong plug and 60-cycle hum, which I'll alleviate by installing a nice long three-prong cable that will ground the chassis.

Powered by the original RCA 6V6 tubes and an 8" speaker, also made in Canada.  Unfortunately this amp has fifty years of dust and nicotine buildup.  Luck for you it can only be seen and not smelled!  A long overdue thorough cleaning is coming up...

Point-to-point hand wiring has stood the test of time ~ a closer look and it appears there has never been a modification or repair needed for this little gem!


Some surface rust on the controls was easily cleaned up with a removal and light sanding.  It was a good time to clean the pots as well to ensure a smoother function.


A pleasant surprise glued to the bottom of the plywood box underneath all that retro-filth ~ the very readable wiring schematic, dated Feb 1961.


If only this grille cloth could talk!  So impregnated with dirt that it must be effecting the tone...
I soaked it in a mild solution of warm water and plain white vinegar for an hour, then sucked it all out with a wet-vac ~ turned out very well!

The speaker and cabinet are still in great shape.  Not one screw hole was stripped and everything went back together very tight.

A little toothpaste (and someone else's toothbrush!) made the original knobs look new again.  

Sunday, September 26, 2010

1960 Harmony H39 Hollywood

A great old maple body archtop in pristine condition ~ this was in for a fret dress and bridge adjustment.

The only thing missing is the tortoise-shell pickguard that covered the wire from the DeArmond pickup to the controls ~ complete with original Bakelite knobs!

The owner had removed the adjustment wheel on the bass side to improve the action.  You can also see some space between the bottom of the bridge and top of the soundboard, meaning it isn't shaped perfectly to the contour of the arch.  The more positive contact you have, the more sound is transferred through the instrument from the string vibration.

This being an unfixed bridge, the first step is to set the intonation perfectly and mark it just underneath at both ends.  You can see here that it sits on a slight angle compared to the photo at the top.  Fortunately there is lots of wood to sculpt along the saddle, so perfect intonation was achieved.

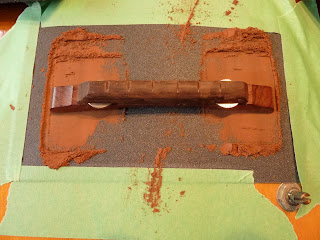
Taping some sandpaper to the soundboard where the bridge sits is a great way to form the bottom to the shape of the arch.  It's important to let the sandpaper do the work and not push down too hard, as that may cause the piece to rock back & forth creating a rounded bottom.  After a few minutes of careful sanding while holding it at the angle of intonation, you can see that only the outside edges of the bridge were in contact.

A few minutes later the whole bottom surface was in contact.  I then taped over the trebble side and brought the bass side down some more to improve the action while making it adjustable again.

Problem solved ~ positive contact with perfect intonation and action!

The inlays on this guitar aren't inlays at all ~ they're painted on!  They were taped over for the fret dress. After a fretboard cleaning and lubricating the original exposed-gear tuners, this guitar was given a thorough polish and was ready for the next 50 years of music!

Wednesday, September 15, 2010

335 Bigsby B70 Install

Here's a guitar that's close to my heart ~ it's exactly the same as my very first one! These particular models were made for just over a year in the Samick factory in Korea. When was the last time you saw a headstock labelled like this?  It was their first opportunity to build guitars for Gibson after so many being made in Japan, so the quality of this era Epiphone is impeccable.

The owner of this guitar once borrowed mine and liked it so much I kept an eye out for one on his behalf.  A little while ago I found this one and installed a bone nut and new wiring as well as a Seymour Duncan Jeff Beck in the bridge and a Seymour Duncan Jazz in the neck ~ perhaps the most popular aftermarket pickup combination which also happens to compliment this guitar incredibly well.

Here's a look at the wiring inside, taken when I wired this guitar together.  I kept the original pots as they were perfectly functional and only mini pots like these can fit inside the f-hole!  After wiring it together on a cardboard template, strings were fed through the holes on the soundboard and attached to their respective components then very gently pulled into place through the f-hole.  A tedious process to say the least, but a fun project!  Next one will be a lot easier...

Just over a week ago the owner approached me about installing a Bigsby on this beauty.  After deciding on a model ~ B70 ~ I ordered one in and it arrived just on time for a very important show in a couple of days!  Time to get to work...

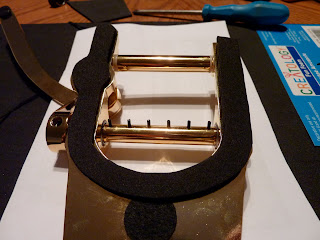
Not a fan of installing this as-is, with only three small points of contact in the form of black felt circles between the bottom of the Bigsby and the soundboard.  The more surface area contact, the more stable this contraption will be.  You can spend big bucks on preformed "tone" mounts made of moulded rubber or silicone, or you can do something that makes a little more sense (and cents!)...

The local craft store has 12"x18" sheets of dense rubber foam, 1/8th" thick for under $2 a sheet!  Same material that the preformed special designed Bigsby mounting adapters are made of.  These also make great protective sheets for doing work on your instrument.

Problem solved ~ 100% positive contact under the entire stringed section.  This material also acts as a bit of a lock-washer, in that it pushes back slightly against the mounting screws when compressed to form a more solid attachment.  Tonally it will dampen vibration allowing it to be transferred through the bridge and soundboard instead of down the tailpiece.

Anchored by only the strap button, I strung a D and G string on the outside posts in the high & low E positions.  This allowed more even and realistic tension when these were tuned to their proper notes, providing an accurate alignment with the bridge.

Something that isn't mentioned in the installation instructions ~ the strings must wrap around the anchor evenly and in-line with the ball end to ensure proper alignment.  If it's off centre, it may pull the Bigsby slightly in either direction.

No power tools allowed!  A hand drill provides much better control over the finished surface.  Painter's tape was used to mark and drill the hole and was removed for this picture.  A cordless drill would certainly do the trick, but there's too much of a risk of harming the finish.  This is a good time to polish the area that will be covered by the Bigsby after it's installed!

Fully installed, the positive surface contact can be seen here.  An added bonus is also that it prevents gig-gunk from collecting underneath!

Ready to go!  After a full polish, new strings and cleaning a scratchy pot, this guitar is ready for the big show.

Wednesday, September 8, 2010

1989 Fender Strat Plus

Put away your belt sander and emery cloth -- this is what "road worn" actually looks like!  This great Silverburst Strat has been a workhorse for one of the busiest players I know ~ and I don't mean his playing!  When you're working all the time like this guitar does, it's either in the case or around your neck on a stage absorbing everything around you...

The initial concern was that the neck pickup was cutting in and out and the pickups seemed loose in their slots.  Once I examined what was under the pickguard and attached to the headstock, it was obvious this guitar needed a little more to prepare it for future shows.

There's a reason why pickguards turn "mint green" or yellow over time ~ nicotine!  The Strat Plus of the era meant it came equipped with Lace Sensor pickups, locking tuners and a roller nut.  The owner became frustrated with the locking mechanism on the back of these tuners and removed them some time ago.  Of course, this didn't cause tuning problems at all considering locking tuners are completely unnecessary to begin with if the guitar is strung and the strings are stretched correctly.  These were replaced with a set of OEM standard Strat tuners.

The roller nut was also replaced by the luthiers at PegHead here in Hamilton, who do great work.  This involved a slight extension of the fretboard on either side of the bone nut that was added.  This guitar is worked quite hard, but despite that it was perfectly tuned and intonated upon arrival.

Some players are extremely picky about the cleanliness and polish of their instruments, others are not, and some are simply too busy playing to care!  This owner wasn't as concerned about polish as he was about it's overall functionality, and he still wanted it to feel like the Strat he's used to playing.  The important part is that the inner workings of the guitar are maintained in good condition, and the rest as they say is the "mojo" ~ or just rock & roll!

Years of being a workhorse has crept underneath this pickguard.  I'm sure a lab analysis would turn up a mixture of coffee, beer, sweat, nicotine and several unknown substances!

Before and after cleaning of the wiring and pots.  A mild solution of vinegar and water and some cotton swabs does the trick, but dry it off quickly and keep it off the pots to prevent any chance of corrosion.  An aerosol electrical contact cleaner can be used for them.  In this case, each of these pots had some scratchiness along some parts of their rotation.  Contact cleaner can be sprayed liberally directly inside while working the knobs back & forth slowly until it dries.

The pickup selector switch seen here was the cause of the intermittent neck pickup.  If rotated aggressively over time the small "fingers" that contact the disk to make the connection can bend outward, losing the connection all together.  Being made of thin tin, repeated bending will eventually break them off so while they can be persuaded back into place a few times as this one was, it's usually best to just replace it.  If you don't have one on hand, however, a neat trick if you're skilled with a soldering iron is to simply tin them once persuaded back in to place, making them a little stronger and prolonging their durability.  Just be careful not to solder them to the contact disk though!

These pickups are held in place by a screw surrounded by a piece of surgical tubing, making a spring type resistance to keep them in place.  Unfortunately the rubber surgical tubing breaks down over time and becomes brittle, making the pickups loose (see the space between the pickguard and tubing on the right).  These pieces were replaced with pickup springs and the problem was solved, long term.

It's as much of a pleasure to see a well played, truly road weary vintage guitar as it is to see one in pristine condition.  This one is ready for many more miles of road, and I'm sure it will be back in the shop for an oil, lube & filter in the future so it can keep on going!